In this new series, Chartered Surveyor Ian Rock FRICS – Author of the Haynes Home insulation Manual – explains how to cut your energy bills by boosting your home’s thermal efficiency.
PART SEVEN:
Insulating Your Loft
In most properties this is the most cost-effective solution to heat loss
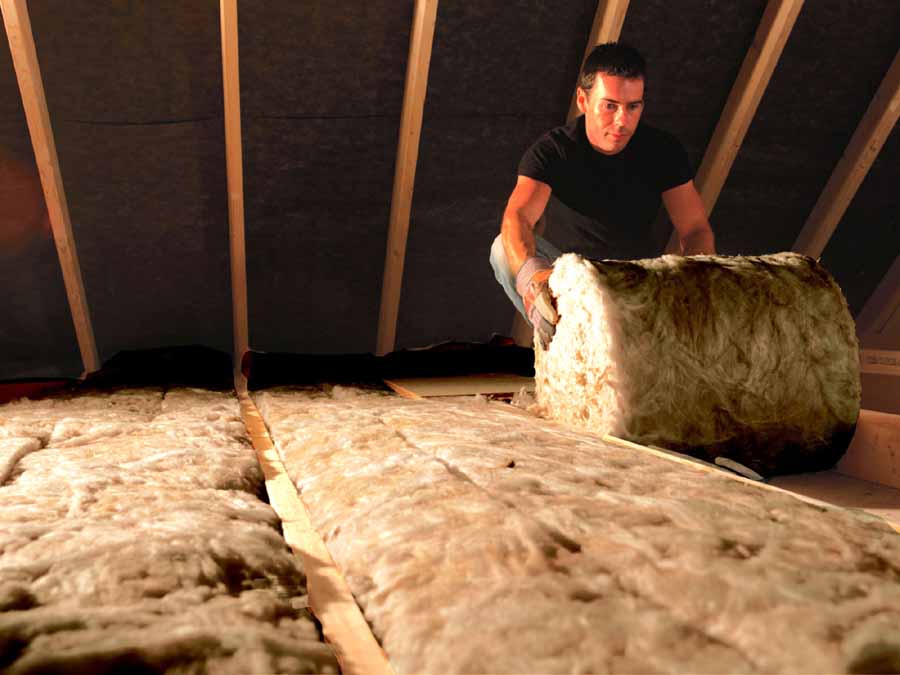
It’s no secret that insulating your loft is one of the most effective ways of making your home more energy efficient. Thanks to the materials being relatively cheap and the fact that laying the insulation should (in most cases) be well within the capabilities of most DIYers, payback periods can be super quick.
This is a project that can pay for itself through reduced heating bills in the space of a couple of years. Indeed, this is one of few home improvement projects where there’s no significant downside.
However that doesn’t mean all lofts are an absolute doddle to treat. For a start, getting access can be awkward or impossible where:-
* The roof has a very shallow pitch
* There’s a small adjoining loft over a rear addition
* The loft has been converted into accommodation
* There’s no loft hatch (in some older houses)
* There are small subsidiary lean-to roofs and porches without any means of access
* Choosing materials
Most of us have had a go, at one time or another, at unfurling large rolls of fluffy, itchy pink or yellow coloured mineral fibre quilt (glass wool or rock wool), which is the most popular material use for insulating lofts.
But this isn’t the only option. Natural sheepswool quilt is pleasant to use with excellent thermal performance, although it’s dearer. Loose-fill materials (such as cellulose fibre made from treated recycled newspapers) are ideal for filling hard-to-reach areas. Loose-fill is supplied in bags for hand filling or can be spayed into position by installers using special blowing machines to form a continuous gap-free layer.
However in most cases rolls of loft quilt insulation will be the material of choice.
* Laying loft insulation
Before you start, it’s advisable to don a dust mask so that you don’t breath in fibres released into the air. Wearing goggles isn’t essential but advisable in some older, very dusty lofts. Good lighting is obviously pretty essential so you can see what you’re doing. And to aid access, and prevent ‘foot-through-ceiling-syndrome’, chipboard floor panels can be temporarily placed over the ceiling joists.
A total depth of 270mm of mineral wool should be sufficient to meet the Building Regulations U-value target of 0.16 Wm2K. Alternatively slightly deeper thickness of sheep’s wool, hemp or cellulose fibre (about 300mm) should do the trick. But while you’re at it, there’s very little extra cost or work involved in laying it thicker than the recommended minimum to maximise thermal performance.
Quilt insulation is best laid in two layers. The first is applied between the ceiling joists (in line with them) over any existing insulation. This is then ‘criss-crossed’ by rolling out the second layer over the top, at right angles over the joists. To reduce the risk of people mistakenly stepping between the joists, injuring themselves and damaging ceilings, boarding can be provided for ‘walkways’. However, because the top layer of insulation will be laid above the joists, any new boarding will need to be fitted in a way that doesn’t unduly compress it – see below:-
When laying loft insulation there are some other key points to bear in mind:-
a/ Don’t squash it
The effectiveness of loft insulation is greatly reduced if it is crushed. If heavy items are placed on top, they squeeze out the all-important air pockets between the fibres that are key to thermal performance. One solution is to place additional timber joists or I-Beams at right angles over the existing ceiling joists, apply insulation in between them, and then lay flooring grade chipboard panels on top (which can also be used for storage).
b/ Avoid thermal bypass
Anywhere large gaps are left within the quilt it can form cold patches that allow ‘thermal bypass’. Cold spots can then attract condensation and mould. This can be demonstrated using a thermal imaging camera, where cold spots show up as dark purple/black patches. To avoid such problems, the insulation quilt must be well packed into all the awkward areas, taking care not to leave any bits completely un-insulated or with significantly differing depths of insulation.
c/ Don’t forget the hatch
For some reason, one part of the loft that sometimes gets overlooked and left un-insulated is the hatch. Yet it’s a fairly straightforward job to line hatches internally. This might take the form of a 100mm rigid insulation board cut to size and glued to the inner face with adhesive, or you could simply encase some spare loft quilt in a plastic sheet and staple it to the hatch.
d/ Minimise thermal bridging
Thermal bridging can occur in lofts at the junctions with cold walls and chimney breasts. These can transmit cold from outside the house to the edges of the insulated ceiling below. To minimise thermal bridging the quilt can be turned up against main walls to a height of at least 200mm. Also, where ceiling joists run parallel to chimneys, party walls or main walls (e.g. at gable ends) it’s advisable to stuff insulation into the gap between the end joist and the masonry. Ideally a breathable type of insulation should be used (e.g. mineral wool or natural quilt materials) so that any moisture is free to disperse.
e/ Keep it ventilated
Lofts are meant to be draughty and unheated above the level of the ceiling insulation – hence this is known as a ‘cold roof’ (as opposed to a ‘warm roof ‘ where the insulation is fitted higher up at rafter level or on top). Once your loft is well insulated at ceiling level, the room warmth should stay where it belongs – in the rooms below.
As a result the loft will now be colder, so there’s a danger that any moist air that gets in will condense as soon as it hits a cold surface. Hence maintaining a good flow of ventilation is important, so that any moist, humid air can be safely wafted away before it has a chance to condense into water and cause problems.
This means care is needed not to block air paths into lofts. Some properties have air vents in gable walls or at ridges, or sometimes special tile vents are fitted to the roof slopes.
Older houses (pre WW2) were generally built without underlay beneath the tiles, and relied on small gaps between individual slates or tiles for ventilation. However in most houses air for ventilation enters via small vents at the eaves and it’s a common mistake to block the eaves by shoving insulation quilt right up to the edges – see ‘tricky bits’ below.
f/ Minimise air leakage
To prevent the risk of damp from condensation in cold lofts, it makes sense to prevent moist, humid air seeping up from the rooms below, especially from steamy bathrooms. As well as allowing warm air into the loft, any gaps can also allow cold draughts to whistle down into the rooms.
So any holes or cracks in the ceiling (e.g. around pipes and extractor fan ducting) should be sealed using a flexible filler or special tape. Also the insulation should be tight fitting because any gaps can reduce the thermal benefits causing cold spots.
Elsewhere in the house, the usual method of stopping moist air getting through is by fitting a vapour barrier (normally in the form of thick plastic sheeting).
But unlike insulating internal walls for example, it’s not really realistic to try and install a vapour barrier retrospectively in lofts – there are too many obstacles that make it impossible to achieve a continuous air-tight barrier. Hence the importance of sealing gaps and ensuring cold loft spaces are well ventilated.
* Tricky bits
Unless you’re very lucky, there will be some parts of the loft that are tricky to insulate. These are some of the more common issues:-
Obstructions
The average loft will contain an array of obstacles that need be carefully navigated. Water tanks and clumps of pipes can be worked around, for example with smaller off-cuts of quilt stuffed around them. But some of the worst offenders are modern trussed rafter roofs with their ‘W’ shaped timber webbing (which on no account should be cut out!). One solution is to apply loosefill insulation which can be blown into tricky corners.
Eaves and edges
As we saw earlier, it’s important for the detailing at the eaves to be done correctly so you don’t block important ventilation paths or inadvertently channel blasts of cold air beneath the insulation.
The simplest solution is to fit special ‘eaves vents’. These are plastic ducts that you can slide down between the rafters to maintain an air path whilst allowing insulation to be pushed right up to them, ensuring there are no gaps left in the coverage.
Recessed down-lighters
Where you have recessed downlighters in the ceiling the usual advice is to leave a clear space on top because covering them with thick layers of insulation can cause overheating. But this means leaving a gaping hole in your insulation, inviting torrents of humid air into the cold loft and leaking heat.
The simplest solution (apart from not having recessed lighting) is to fit ’downlight attic seals’ which cleverly leave sufficient space above your existing lights whilst allowing a full depth of insulation to be laid from above. And while you’re at lit be sure to replace any older existing inefficient lights with high performance LED bulbs.
Electric cables
Electric cables give off heat when current flows through them. Where they are covered by insulation, there can potentially be a risk of overheating and short circuiting. However this is more likely to be a problem where you have cables supplying large loads, such as those serving cookers and storage heaters (rarely run in lofts), and electric showers. Lighting cables are less likely to be prone to overheating.
As a precaution, electric cables should either be either clipped out of the way above the insulation or sheathed inside spacious conduit leaving an air space around the cable. Alternatively you could replace them with thicker, higher capacity cable that will generate less heat.
Water tanks and pipes
In quite a few lofts there is a traditional cold water tank, together with a smaller ‘feed & expansion’ tank (serving the heating system).
Once the ceiling has been insulated the roof space will be much colder, increasing the risk of freezing. And any moist humid air that gets into the loft and encountering exposed cold surfaces to tanks and pipes will prone to condensation, which can drip down causing damp patches to ceilings. So it’s important for water tanks and pipework to be lagged.
But there’s another problem with cold water tanks in lofts. It’s standard practice to keep the ceiling directly underneath them free of insulation so that warm air from the room below will percolate up through the ceiling and prevent the tank from freezing. At last that’s the theory. But this only works if the tank is completely enclosed inside a thick ‘tent’ of insulation (which in reality they rarely are). So, as with recessed lights, following this advice is likely to blow a massive hole in your home’s thermal defences.
The best advice is to lay insulation across the whole ceiling including the area directly underneath water tanks. The tanks should then be fully insulated, including the base. This can be done by emptying the tank and slipping a thick rigid board of flooring-grade polyurethane underneath, between the tank and its deck. Alternatively mineral wool can be stapled to the underside of the deck (where accessible).
Ready-made lagging jackets can be bought at DIY stores for fitting around tanks. Also, tight-fitting lids should be installed to seal off this potential source of water vapour.
Sloping ceilings
Many larger Victorian houses were built with attic rooms for servants, with the lower part of the roof structure around the edges of the rooms lined in lath & plaster. But because no insulation was fitted, these areas of sloping ceilings near the eaves can be very cold. Insulating sloping ceilings is not usually practical from above, as stuffing insulation down them between the rafters will block ventilation paths to the loft.
The optimum method is to strip the roof on the outside and lay insulation boards externally before re-cladding it. But this means raising the height of the roof, which is likely to have major planning implications, and will also require expensive scaffolding to get access.
Alternatively you could take down the old lath & plaster and replace it with a thick layer of insulation before plasterboarding, but this destroys old fabric and is incredibly messy.
A better solution can be to fix sheets of insulated plasterboard over the existing ceiling surface secured with dry wall screws into the rafters (although there is a small loss of headroom).
Finally, bear in mind that with older properties it’s always a good idea to consult an expert in historic buildings.
NEXT MONTH: Living the high life. Insulating your roof at rafter level to create a nice warm and dry loft space.
Ian Rock’s home insulation tips are taken from the new Haynes Home Insulation Manual. For further information see www.home-insulating.com


